
前言
最近内网渗透的工作比较多,这里总结一下域内渗透的相关知识
SPN查询
用法:
powershell -executionpolicy bypass -command "& { import-module C:\Users\123\Desktop\1.ps1; Discover-PSInterestingServices -OptionalSPNServiceFilter (\"Microsoft Virtual Console Service\",\"Dfsr\") }"

\"Microsoft Virtual Console Service\",\"Dfsr\")这些是想要获取的服务名称,使用,分割
如果没有OptionalSPNServiceFilter参数没有指定任何服务,那么默认就只搜索ftp服务
要想找文件服务器,除了ftp服务之外,也可以尝试nfs服务
获取ADIDNS记录
参考:
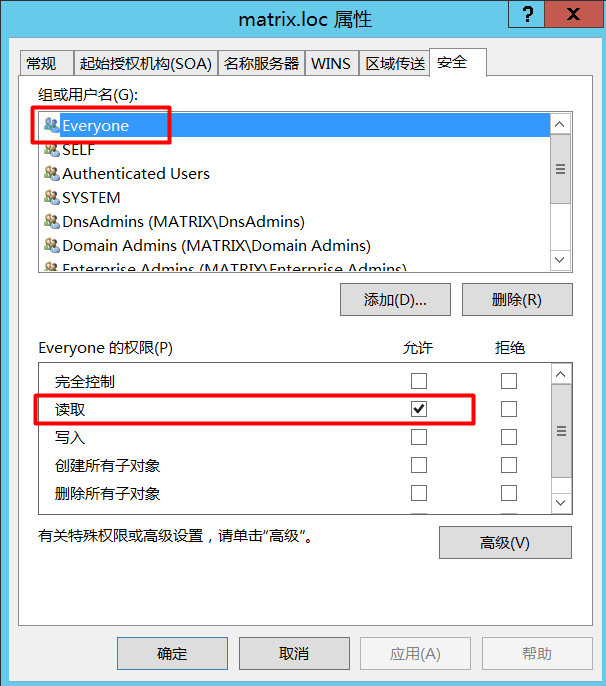
ADIDNS——活动目录集成DNS,默认情况下,任何经过验证的域内用户都能够读取域内所有DNS记录
使用Dirk-jan Mollema大佬编写的工具https://github.com/dirkjanm/adidnsdump即可非常方便地导出域内所有的DNS记录,使用方法如下:
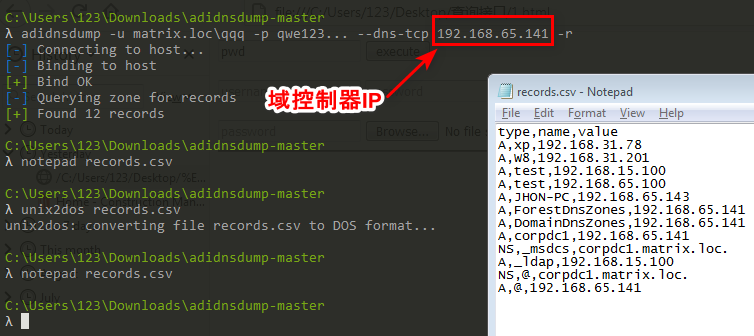
adidnsdump -u matrix.loc\qqq -p qwe123... corpdc1.matrix.loc -r
最后的结果会保存在当前目录下的records.csv文件中,如果我们是使用socks等代理的方式进行记录的导出,可以通过--dns-tcp标志,并将最后的HOSTNAME换成域控制器的IP即可
由于DNS记录并不总是存在于DomainDNSZones应用分区中,所以我们在导出DNS记录时应先使用--print-zones参数打印出当前域所拥有的所有DNS区域以及他们所在的分区
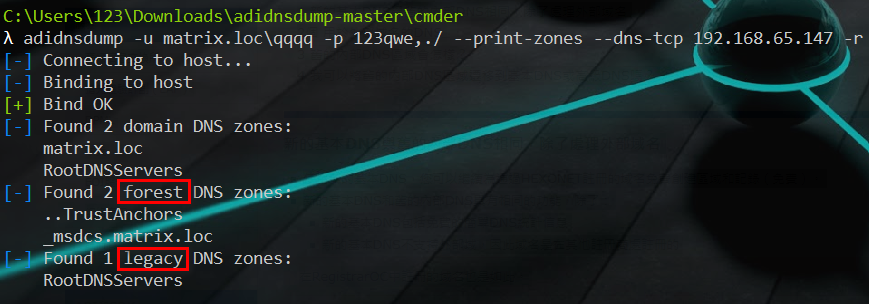
对于forest分区,需要在导出时加上--forest选项,而对于legacy分区,则需要在导出时加上--legacy,如下面两张图所示:

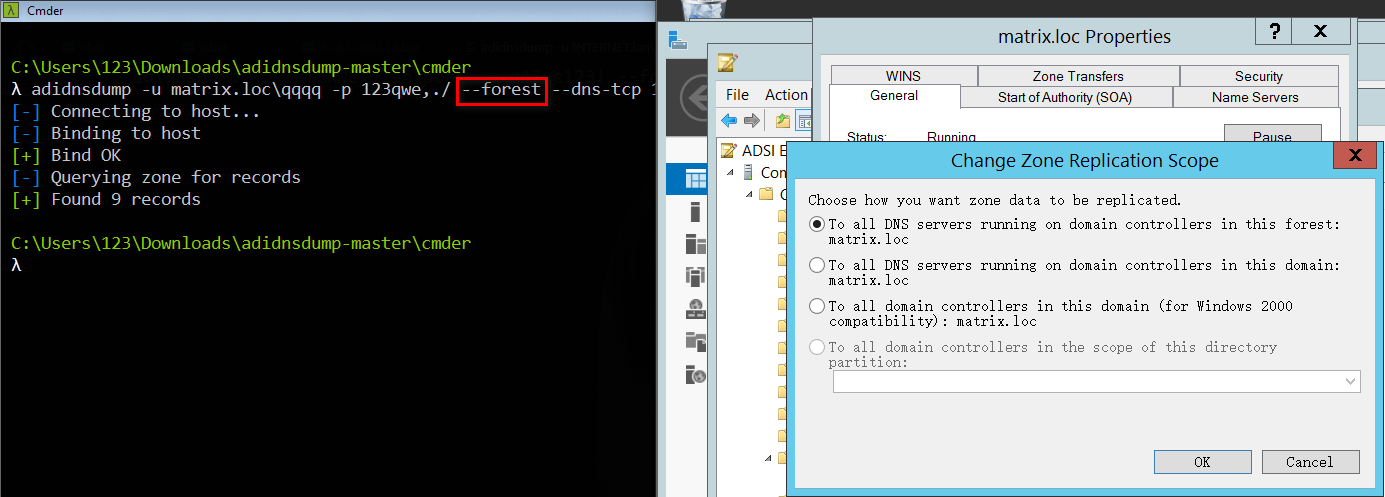
其中legacy DNS zones是由低版本的域控制器升级产生的,比如windows 2000并没有应用分区这个概念,所以在升级之后就会存在于该分区,其DN一般为DC=domain.local,CN=MicrosoftDNS,CN=System,DC=domain,DC=local
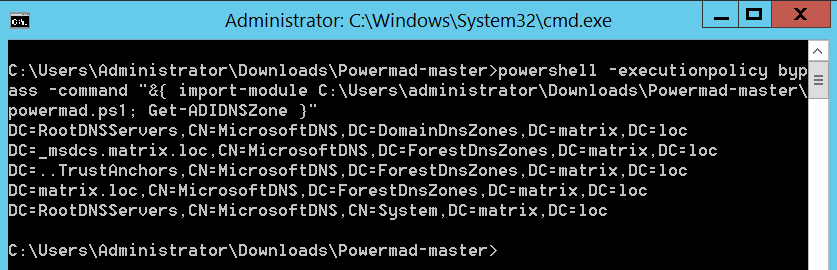
准确的DNS区域dn可以使用powermad查询
在cmd下执行如下命令
powershell -executionpolicy bypass -command "&{ import-module C:\Users\administrator\Downloads\Powermad-master\powermad.ps1; Get-ADIDNSZone }"
csvde导出域内信息
下载链接:https://gitee.com/wochinijiamile/smartya/raw/master/csvde.exe
csvde导出域内信息会产生的日志

- 首先产生事件ID为
4776的凭据验证日志,在这里可以看到执行导出操作的机器的hostname - 然后产生事件ID为
4672的特殊登录日志,为新登录的账户分配特殊权限,在这里可以看到登录账户拥有的权限,但是看不到源主机 - 产生事件ID为
4624的登录日志,在这里可以看到源主机的hostname和IP乃至TCP连接的端口信息 - 最后产生事件ID为
4634的注销日志,这里的信息比较少
基本参数说明和处理脚本的编写
csvde导出域有两种方式,一种是将csvde传入目标内网机器进行信息的导出,另一种是通过proxyfier代理进入目标内网来进行信息的导出
导出uoiysdf.iuodsf.vi域的所有信息
- -s指定远程域控制器IP
- -b指定导出数据使用的用户名,后面紧跟目标域名和用户密码
- -d指定目标BaseDN,形如:
"dc=uoiysdf,dc=iuodsf,dc=vi" - -m指定输出中不包含二进制数据,但是仍然会出现十六进制(这个可以使用python脚本进行处理)的数据,多出现在description属性中(因为可能包含中文)
- -f指定输出文件
- -u指定unicode编码,不过貌似没有用 导出的结果会存储到csv文件中,直接使用excel打开会显得比较混乱,推荐使用notepad++等专业编辑器打开
csvde -s 192.168.1.10 -b administrator uoiysdf.iuodsf.vi 43u96tgjirbtgpnk3w4o9-ip -d "dc=uoiysdf,dc=iuodsf,dc=vi" -m -f res.csv -u
我们主要通过ldap过滤器来筛选出我们想要导出的数据
python处理脚本(参考):
#coding:utf-8
import csv
import codecs
from datetime import datetime
import binascii
import argparse


def code_convert(content):
    # bytes => str  to display
    if type(content) == bytes:
        content = content.decode()
    return content

def hex_parse(hexstr):
    hexstr = binascii.a2b_hex(hexstr)
    result = code_convert(hexstr)
    return result

def line_parse(line, flag):
    # parse every line with hex
    new_line = []
    i = 0
    for temp in line:
        i = i + 1
        #跳过时间戳那一列的处理,这里根据自己的实际情况更改i的值
        if i != 3 and temp and temp[0] == 'X':
            try:
                temp = temp[2:-1]
                temp = hex_parse(temp)
            except Exception as ex:
                temp = "Parser Error,The error is {} .Please go to https://tool.lu/hexstr/ .".format(ex)
        #windows时间戳处理代码,使用falg标志是否为第一行,避免处理表头
        if i==3 and flag==False and line[2] and line[2] != "0":
            print(line[2])
            ttttt = int(line[2])
            ts = int((ttttt / 10000000) - 11644473600)
            temp = datetime.utcfromtimestamp(ts).strftime('%Y-%m-%d %H:%M:%S')
        #在每列的值前后加上"是为了后需使用excel处理csv文件时更加方便,因为以,作为分隔符,同时导出的计算机的dn上
        #又带有,,如果没有"将其包围,会导致最终产生的表格内容混乱
        temp = '"' + temp
        temp = temp + '"'
        new_line.append(temp)

    #print(new_line)
    result = ','.join(new_line)
    return result

def file_write(result):
    with open('results.csv', 'a+', encoding="utf-8") as h:
        h.write(result)
        h.write("\n")
    h.close()

if __name__ == '__main__':
    parser = argparse.ArgumentParser(description='Parse the csvde result')
    parser.add_argument('-f', '--filename',dest='filename',action="store",
                    help='the file to convert')
    parser.add_argument('-hs', '--hexstr',dest='hexstr',action="store",
                    help='the hex str to decode')
    args = parser.parse_args()
    if args.filename:
        filename = args.filename
        print(filename)
        reader = csv.reader(codecs.open(filename, 'rU', 'utf-16'))
        #head_row = next(reader)
        i = 0
        for line in reader:
            i = i + 1
            flag = False
            if i==1:
                flag = True
            line = line_parse(line, flag)
            file_write(line)
    if args.hexstr:
        hexstr = args.hexstr
        res = hex_parse(hexstr)
        print(res)
在线转换
根据网上的代码自己修改了一下,可以满足基本需求
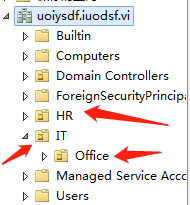
导出域内OU信息
在powershell中使用如下命令创建出三个OU:
New-ADOrganizationalUnit -Name IT -Path "DC=uoiysdf,DC=iuodsf,DC=vi"

New-ADOrganizationalUnit -Name Office -Path "OU=IT,DC=uoiysdf,DC=iuodsf,DC=vi"

New-ADOrganizationalUnit -Name HR -Path "DC=uoiysdf,DC=iuodsf,DC=vi"
使用-r选项设置ldap过滤器,-l选项指定想要获取的属性,这里我们选择dn和description属性
这里我们使用objectClass=organizationalUnit筛选出ou,起始位置为ou=it,dc=uoiysdf,dc=iuodsf,dc=vi
csvde -s 192.168.1.10 -b administrator uoiysdf.iuodsf.vi 43u96tgjirbtgpnk3w4o9-ip -d "ou=it,dc=uoiysdf,dc=iuodsf,dc=vi" -r (objectClass=organizationalUnit) -l dn,description -m -f res.csv -u
结果如下:
DN,(null)
"OU=IT,DC=uoiysdf,DC=iuodsf,DC=vi"
"OU=Office,OU=IT,DC=uoiysdf,DC=iuodsf,DC=vi"
由于我们在创建的时候并没有设置description属性,所以是null
获取域内所有组的信息
将objectClass的值设置为group即可,一般用户组的重要属性为dn、descriptioon、member、memberOf
导出的结果包含计算机组和用户组
导出域内所有计算机信息
csvde -s 192.168.65.138 -b administrator adlab.com qwe123... -d "dc=adlab,dc=com" -r (objectClass=computer) -l dn,description -m -f res.csv -u
只需要把objectClass的值改为computer即可
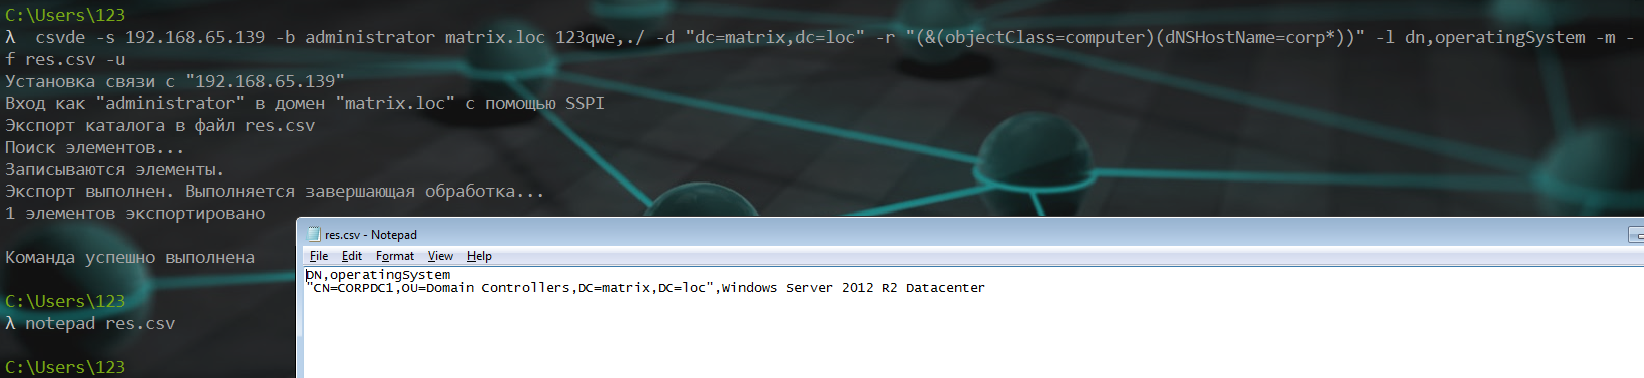
使用通配符搜索符合条件的对象
csvde -s 192.168.65.139 -b administrator matrix.loc 123qwe,./ -d "dc=matrix,dc=loc" -r "(&(objectClass=computer)(dNSHostName=corp*))" -l dn,operatingSystem -m -f res.csv -u
导出域内所有人员信息
csvde -s 192.168.65.128 -b administrator adlab.com qwe123... -d "dc=adlab,dc=com" -r "(&(objectcategory=person)(!(objectClass=computer)))" -l dn,description,sAMAccountName,pwdLastSet,lastLogonTimestamp -m -f res.csv -u
!(objectClass=computer)用于排除计算机账户
枚举外部安全实体(foreignSecurityPrincipal)并在对应域中进行定位
C:\windows\temp\csvde.exe -s 192.168.60.161 -b administrator domain2.com ...qwe123 -d "dc=domain2,dc=com" -r "(objectClass=foreignSecurityPrincipal)" -l Name -m -f C:\windows\temp\res.csv -u
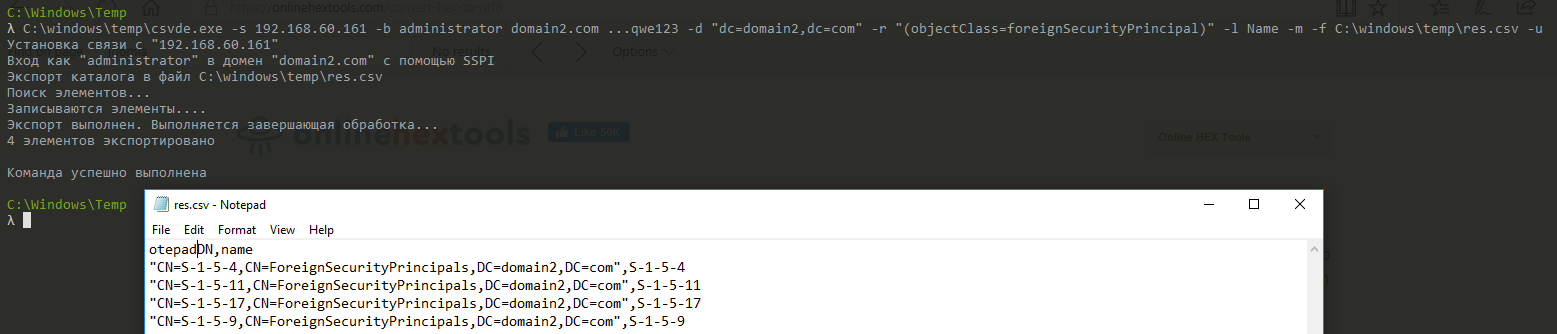
在对应域中定位这些安全实体:
C:\windows\temp\csvde.exe -s 192.168.60.161 -b administrator domain2.com ...qwe123 -d "dc=domain2,dc=com" -r (objectSid=S-1-5-4) -l Name,department,description,title,sAMAccountName -m -f C:\windows\temp\res.csv -u
枚举域内信任关系
这个也可以使用dsquery来完成,同样也是使用ldap筛选器,只需要把objectClass的值设置为trustedDomain即可
csvde -s 192.168.1.10 -b administrator uoiysdf.iuodsf.vi 43u96tgjirbtgpnk3w4o9-ip -d "dc=uoiysdf,dc=iuodsf,dc=vi" -r (objectClass=trustedDomain) -m -f res.csv -u
从NETLOGON共享中搜集信息
域管理员为了给计算机或用户部署登录脚本,可能会在NETLOGON共享中放一些登录脚本,这个共享在整个域中都可以访问到,因此可以用于供域内计算机读取登录配置并执行
在当前的实验环境中,该共享可以在如下网络位置访问到
\\uoiysdf.iuodsf.vi\NETLOGON